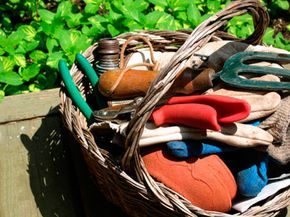
Healthy plants demand soil that isn’t just dirt. It needs structure. It needs food. You are looking for a specific blend of sand, silt, clay, and organic matter to create a growing medium that supports life rather than just holding plants up. Most of us don’t wake up with perfect earth in our backyards. You likely need to put in some work before your garden reaches top condition.
If your yard lacks the loose, dark, rich soil you see on television shows or in glossy magazines, do not panic. It is fixable. You can improve existing soil for better fertility and drainage. The goal is balance. Sandy soil? Add clay to hold moisture. Clay-heavy soil? Add sand to improve drainage. But the universal booster is organic matter. Old leaves. Ground-up twigs. Livestock manure. Even old lawn clippings work. Fertilizers help too, but organic material is the foundation. It nourishes any type of soil, encouraging root growth and overall plant health. Some soils start out pretty good. Others need significant intervention to support a beautiful garden.
Understanding Your Soil Composition
Your texture checkup gave you the percentages of sand, silt, and clay. That is a solid starting point. But do not start throwing amendments around yet. Test the soil first. There is a reason for the old adage: “If it ain’t broke, don’t fix it.” Tampering with nutrients or pH levels without data can create more problems than it solves. You might lower acidity when the plants need it higher. You might over-fertilize, burning the roots.
Garden soil tests provide clarity. They show you the acidity level. They tell you how to balance it for your specific plants. In this guide, we will cover how to improve soil quality using mulch, compost (which might mean building a pile), and various fertilizers. We will also look at the unique properties required for container gardening. Keep reading to begin the process of testing your garden soil properly.
Reading Your Weeds as a Diagnostic Tool
The weeds are trying to tell you something. Look at the vacant areas. If few weeds are taking advantage of the opening, the soil is likely poor. It needs plenty of work. If weeds are growing but are sparse, with short, stunted stems and discolored leaves, you have a nutrient deficiency. A soil test is in order here.
“Weeds are nature’s soil diagnostic tool.”
Watch how they sprout in newly tilled soil. If weeds pop up quickly in certain areas and slowly in others, the weedy patches are likely moister and better suited for seed germination. That moisture difference is a clue. Take notes. Use that information.
Why Soil Testing Matters for Plant Health
Why does the acidity level matter so much? Because it controls nutrient availability. If the pH is off, your plants cannot absorb what they need, even if you add plenty of fertilizer. Testing tells you the exact pH. It tells you what amendments to add to balance it. Without this data, you are guessing. And guessing in gardening is expensive and time-consuming.
You will learn about using mulch to retain moisture and regulate temperature. You will learn about compost, which adds organic matter and beneficial microbes. You will see different types of fertilizers and when to use them. You will also discover why container soil is different from in-ground soil. Container mixes need to drain faster and hold less weight. They require specific blends to prevent root rot.
Common Mistakes in Soil Preparation
Many homeowners skip the test. They assume their soil is fine. They buy a bag of “miracle grow” and dump it on top. This often leads to salt buildup. It can alter the pH in unpredictable ways. It does not address the underlying texture issues. If your soil is heavy clay, adding nitrogen won’t make it drain better. You still need organic matter or sand to improve structure.
Conversely, if your soil is too sandy, it drains too quickly. Nutrients wash away before the plants can use them. Here, organic matter is the hero. It holds both water and nutrients. It creates a crumbly texture that roots love.
Next Steps in Soil Improvement
Start by collecting samples. Get a trowel. Dig down about 6 inches. Take samples from different spots in the garden. Mix them together. This gives you a representative average. Do not test right after adding lime or fertilizer. Wait at least a month. The test results will guide your next moves.
You will learn how to build a compost pile if you do not have one. Compost is free, essentially. It recycles waste. It improves soil structure dramatically. It is not just about adding nutrients. It is about adding life. Microbes, fungi, earthworms. They all thrive in organic-rich soil.
“Compost is not just fertilizer. It is a habitat.”
Once you have the test results, you can move to the amendment phase. Mulch will be discussed next. It protects the soil surface. It
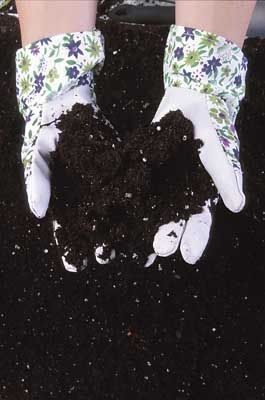
Soil testing is basically the nutrition label for your garden ground. It gives you the raw data on nutrients, pH, and organic content. You need this info to keep things running smoothly. Contact your local Cooperative Extension Service to get a kit. They are usually listed under county or federal government directories. The kit includes a bag for collecting samples and specific instructions.
Follow those instructions exactly.
If you skip steps, the report will be wrong.
The results often look like a wall of numbers. It is easy to get overwhelmed. Focus on three specific metrics instead.
Decoding the Numbers
First, check the organic matter. If it is below 5 percent, you need more compost. Your plants will starve without it.
Next, look at the nutrient levels. They might be in parts per million or rated as high, medium, or low. If something is low, buy a fertilizer that targets that specific deficit.
Finally, look at the pH. This measures acidity.
Soil pH refers to the acidity of the soil. Ratings below 7 are acidic soils. From 6 to 7 are slightly acidic, the most fertile pH range. Above 7 is alkaline or basic soil, which can become infertile above pH 8.
Excessively acidic or alkaline soil can be treated. You just have to know what to add.
Skip the Big Dig
You do not always need to tear up the lawn to start a garden. Kill the sod or dense weeds by layering materials directly on the site. Use newspaper, then compost, then mulch.
This blocks sunlight.
Weeds die. They decay and become organic matter. The newspaper decomposes too. It is a cheap way to start fresh without heavy labor.
How to Adjust Soil pH Levels
Your test results will tell you if the ground is too acidic or too alkaline.
If the pH is low, the soil is acidic. You can grow acid-loving plants. Or you can use ground limestone. Limestone is a natural soil sweetener. It neutralizes acidity.
Add limestone in the fall. This gives it time to dissolve before spring planting. Do not guess the amount. Overdosing with lime damages the soil. Follow the package guidelines or the soil test report. Check the pH every year. Add more limestone only as needed.
If the soil is alkaline (pH above 7), you need to lower the pH. Use these amendments:
- Cottonseed meal
- Garden sulfur
- Pine bark
- Compost
- Pine needles
Garden sulfur is a reliable option. It acidifies the soil slowly. Microbes convert the sulfur into sulfuric acid and other compounds.
Organic materials like compost and pine bark also lower pH gradually. They improve texture while they work.
Sources of Specific Nutrients
You do not need to harvest these yourself. Most are available processed and packaged.
Nitrogen comes from:
– Bat guano
– Blood meal
– Chicken manure
– Cottonseed meal
– Fish emulsion
– Kelp meal
– Livestock manure (composted)
Phosphorus is found in:
– Bonemeal
– Rock phosphate
– Super phosphate
Potassium sources include:
– Granite meal
– Greensand
– Seabird guano
– Shrimp shell meal
– Sulfate of potash
– Wood ashes
Calcium can be added via:
– Bonemeal
– Chelated calcium
– Eggshells
– Limestone
– Oyster shells
– Wood ashes
Boron comes from:
– Borax
– Chelated boron
– Manure
Copper is available as:
– Chelated copper
Magnesium sources include:
– Chelated magnesium
– Dolomitic limestone
– Epsom salts
Sulfur is found in:
– Iron sulfate
– Elemental sulfur
– Zinc sulfate
Zinc comes from:
– Chelated zinc
– Zinc sulfate
Iron is available as:
– Chelated iron
– Iron sulfate
Composting remains the cheapest way to boost nutrients organically. Once you know what your soil lacks, you can target the fix.
Compost is the easiest way to pump organic matter into any garden soil. It’s not magic. It’s just broken-down organic material where the minerals and nutrients are finally accessible to your plants. You can buy it by the bag, sure. Or you can make your own.
Making it yourself recycles your kitchen scraps and yard waste. Plus, it costs nothing. The secret to speed? Balance. Organic material decays fastest when you blend nitrogen-rich greens with carbon-rich browns. Aim for roughly equal parts of each.
What Goes Into the Bin
You need two categories. Get them wrong, and your pile smells like a swamp. Get it right, and it turns into black gold.
Nitrogen-rich “Greens”
These break down quickly. They add moisture and heat.
– Manure from herbivores (chickens, cows, horses, rabbits, pigs, guinea pigs)
– Fruit and vegetable peels
– Grass clippings
– Fresh green leaves
– Strips of turf
– Alfalfa
Carbon-rich “Browns”
These provide structure and aeration. Without them, your pile gets soggy and anaerobic.
– Wood chips
– Ground-up twigs
– Sawdust
– Pruning scraps
– Dry autumn leaves
– Straw
Essential Tools and Gear
You don’t need a fancy system. A wire bin works. A wooden box works. Even a stack of Vented plastic bins works. But a few specific tools save time.
- Garden fork: For turning. Essential.
- Sifting screen: To separate finished compost from chunks.
- Compost thermometer: To monitor heat.
- Compost tumbler: For those who hate lifting heavy bins.
- Worm boxes: For indoor or small-space composting.
- Compost inoculant: Optional. Speeds up the process if you’re impatient.
How to Start Your Compost Pile
- Choose your spot. Sunny or shady, it doesn’t matter much. Flat ground is best.
- Lay a base. Add a layer of coarse twigs or straw for drainage.
- Add greens. Start with a handful of kitchen scraps or fresh grass.
- Cover with browns. Immediately top with leaves, wood chips, or straw. This prevents flies and odors.
- Layer. Continue alternating greens and browns. Think lasagna.
- Moisten. The pile should feel like a wrung-out sponge. Too dry? Add water. Too wet? Add more browns.
- Turn. Use a garden fork to mix the pile every week or so. This adds oxygen.
“Compost is simply organic matter that has already broken down sufficiently for its minerals and nutrients to be accessible to plants.”
Why Balance Matters
If you only add greens, your pile becomes a slimy, anaerobic mess. Smells terrible. Attracts pests.
If you only add browns, decomposition stalls. It stays brown. Nothing happens.
The goal is a 50/50 ratio by volume. Not by weight. A cubic foot of leaves is lighter than a cubic foot of man
The DIY Compost Method That Actually Works
You don’t need to buy expensive amendments to feed your garden. A home compost pile gives you nutrient-dense soil for free. The catch? You have to manage the biology.
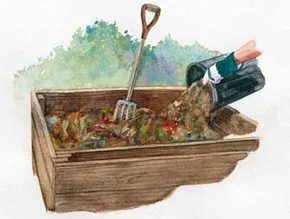
Start in a far corner of the yard. Or use a bin. Wooden slats work. Wire mesh works. If you install a small access door near the bottom of your bin, you can scoop out finished compost while the rest continues to rot above it. That’s efficient.
The ratio matters most. Aim for equal parts green and brown materials. Greens are soft and wet. Think fresh leaves, grass clippings, or manure. Browns are dry and hard. Dead leaves, chopped twigs, straw. Mix them evenly.
Some gardeners swear by compost starter. You can buy it at garden centers or online. These packets contain decay-causing microorganisms. Some brands add nutrients, enzymes, or hormones to speed up the process. They help break down tough stuff like wood chips and sawdust. But they aren’t necessary.
Good old garden soil or woodland dirt works just as well. It’s cheaper. It’s free if you dig it up. It contains native decomposers that know how to handle your local climate. Sprinkle a shovelful of soil between every few layers of yard scraps.
Chop your materials smaller before composting. Use a chipper-shredder. A mulching mower works too. Smaller pieces decay faster. More surface area means more microbial action.
Aeration Without the Back Pain
A proper compost pile needs air. Decomposers need oxygen to generate heat. If the pile stays cool, things rot slowly. If it gets hot, it kills weed seeds and disease spores. You want it warm enough to steam on a cool morning. That temperature range semisterilizes the mix.
Turning the pile with a pitchfork is hard work. It’s back-breaking. And often unnecessary if you plan ahead.
Use perforated PVC pipes. Drill holes along the length of a 4-inch pipe. Place it in the center of your pile before you start building layers. Start with a base of branched sticks. This allows air to rise from below. Add leaves, grass, and kitchen scraps around the pipe. Air flows through the holes directly into the core.
Keep the pile three to four feet high. That height traps heat. Smaller piles cool down too fast.
When to Buy Instead
Making compost takes months. You might not have months to wait. Many gardeners buy bagged compost instead. It’s not lazy. It’s practical.
Whether you make it or buy it, compost improves soil structure. Clay soil becomes lighter and better aerated. Sandy soil gains water-holding capacity. It’s the universal soil conditioner.
Next, we look at mulch. It’s another tool for building soil health.
More Gardening Resources
If you need more soil advice, check these guides:
- How to Start a Garden
- Garden Soil Tips
- Vegetable Garden Soil
- Annuals for Average Soil
- Perennials for Average Soil
- Gardening Basics
Compost gets the glory, but mulch is the quiet workhorse keeping your garden alive.
Add a thick layer. Let it sit. Watch it rot.
That’s the process. As the organic matter breaks down, it turns into a nutrient-rich soup that sinks straight into your existing garden beds. This isn’t just surface decoration. The minerals seep down to feed plant roots. Meanwhile, humic acid—a byproduct of that decay—acts like a glue for clay particles. It clumps them together. The result? Lighter, fluffier soil that actually allows roots to breathe.
It works. But you have to do it right.
The Nitrogen Trap
Woody mulches are fantastic. Shredded bark is a staple for a reason. But there’s a catch.
As wood decays, bacteria feast on it. They need nitrogen to do that job. They take it from the soil.
If your plants are already competing for limited nitrogen, this new process starves them. You need to counteract this. Apply extra nitrogen when you lay down heavy wood mulch. It keeps the soil balanced so your plants don’t suffer while the mulch works.
Avoid the Mat
Not all mulch behaves the same. Fine-textured materials like grass clippings are risky if you’re not careful.
Pile them too thick.
They mat down. The layers compress into an impermeable sheet. Air and water can’t get through. The soil underneath starts to suffocate. If you use grass clippings, keep them thin. Or mix them with coarser materials. Never let them form a solid crust.
Watch the Drainage
Mulch holds moisture. That’s a feature, not a bug.
But in areas with poor drainage, it’s a liability. If water pools, you create a swamp. Swamps attract slugs. They attract snails. They attract rot.
Only use moisture-retaining mulch in beds that drain well. If your garden stays soggy after rain, skip the heavy mulch or raise your beds. Don’t turn your garden into a breeding ground for pests.
“Humic acid clumps together small particles of clay to make a lighter, fluffier soil.”
The Autumn Shortcut: Mowing as Mulching
You don’t need to rake leaves. Not if you have a bagger.
This trick saves time and builds soil simultaneously.
Set up your mower with the collection bag. Run over the fallen leaves in autumn. The blades shred them into tiny pieces. They mix directly with the grass clippings.
This isn’t just cleaning up. It’s creating compost in real-time.
The shredded leaves and grass form a dynamic mix. It breaks down faster than whole leaves. It’s richer in nutrients. It’s “dynamite” for your compost pile, as many gardeners call it.
Building Winter Compost
Dump the mower bag contents in a quiet corner of your yard.
Don’t let it sit undisturbed all winter.
Take a garden fork to the pile every few weeks. Fluff it up. Aeration speeds up decomposition. It prevents the pile from going anaerobic and smelling like rotten eggs.
If you maintain it, you’ll have dark, rich compost by spring. Or even summer, depending on the weather.
It’s not magic. It’s just physics and biology working in your favor.
Garden Fertilizer
If the soil test shows gaps, mulch alone won’t fill them. You need targeted nutrition.
Garden soil rarely comes out of the box ready for high-yield planting. Most home gardens need a boost. You’ve probably already added mulch or compost, but those alone might not hit the specific nutrient targets your plants crave. That is where packaged fertilizers step in.
But which type fits your DIY project? The answer depends on what you are growing and how much work you want to do this season.
Organic Fertilizer Benefits
If you prefer a slower, steadier approach, organic options are the way to go. These include composted manure, bone meal, or kelp extracts. They do more than just feed plants. They improve soil texture and add beneficial organisms that keep the nutrient cycle going naturally.
There is a catch. Organic fertilizers have lower concentrations of nutrients by weight. You might be looking at 1 to 6 percent nitrogen in an organic blend. Compare that to synthetic lawn food, which can hit 30 percent nitrogen. You will need to apply organic fertilizer in larger volumes to get the same effect.
“Lower-dose organic fertilizers are unlikely to burn plant roots or cause nutrient overdoses.”
This is a huge safety net for beginner gardeners. It is hard to kill a plant with organic fertilizer. The nutrients release slowly over time. This prevents that intense “burn” that happens when synthetic chemicals hit wet roots too quickly. Plus, you get trace elements and even enzymes that synthetic bags often miss.
Synthetic and Chemical Fertilizer Options
Synthetic fertilizers are the high-performance cars of the gardening world. They are concentrated. A small amount goes a long way. They are also fast-acting. If your plants look wilted and yellow, a liquid soluble fertilizer can hit the roots immediately.
However, this speed requires discipline. You must reapply frequently. One dose won’t last all season. And if you measure wrong, you risk burning your plants.
The numbers on the bag matter here. You see three numbers, like 5-5-5 or 10-20-10. These represent nitrogen (N), phosphorus (P), and potassium (K).
- Nitrogen (N): Pushes leaf growth. Lawn foods are high in this.
- Phosphorus (P): Encourages roots and blooms.
- Potassium (K): Supports overall plant health and disease resistance.
If you are growing tomatoes or flowers, you might want a “bloomer” mix. These have lower nitrogen and higher phosphorus and potassium, like a 5-10-10 ratio. For a standard vegetable garden, a balanced 5-5-5 or 10-10-10 is usually a safe start.
Time-Release vs. Liquid Feeding
You have two main delivery systems to choose from.
Time-Release Fertilizers
These usually come as beads or granules. They coat the nutrients in a polymer shell that breaks down slowly. Rain or watering triggers the release. You get steady feeding all season long. It is a “set it and forget it” strategy. Ideal for roses, holly, and perennials.
Liquid/Soluble Fertilizers
These dissolve in water. You pour it on, and the plants drink it up right away. It is an instant boost. But the effect is short-lived. You need to mix and apply it again soon. Great for a quick rescue mission or for seedlings that need immediate attention.
How to Apply Fertilizer Without Messing Up
Reading the label is not optional. It is the manual for your specific plants. The volume required changes based on:
- The plant type: Tomatoes eat more than ornamental grasses.
- The season: Plants need more fuel in spring and summer.
- The soil condition: Poor soil might need more initial amendment.
Always wear gloves. Mix chemicals with care. Spread evenly. Don’t pile it up against stems. That is a quick path to rot or burn.
Which Fertilizer Should You Choose?
There is no single winner.
- Choose organic if you want to build long-term soil health and avoid burning your plants. Be prepared to apply more volume.
- Choose synthetic if you need a fast fix or are working with heavy clay that needs a quick nutrient punch.
- Choose time-release if you have limited time and want steady growth for perennials and shrubs.
- Choose liquid if you have annuals that need a rapid start or if your plants are showing acute deficiency symptoms.
Start with a soil test if you can. It tells you exactly what is missing. If you skip the test, a balanced organic blend is a forgiving entry point. You can always add more later, but you can’t take away excess chemicals once they are in the ground.
Gardening is about experimentation. Try one method this year. See how your plants respond. Adjust next season.
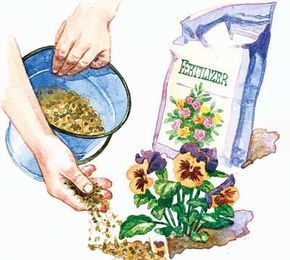
How to Side-Dress Plants for a Summer Boost
Granular fertilizers don’t mess around. They release nutrients faster than their organic counterparts. If your annuals are lagging, a quick side-dress can turn things around. You don’t need a degree in chemistry. Just a handful of 5-10-5 fertilizer.
Sprinkle it around the base of each plant. Not on the stems. On the soil. Do this in spring. Do it again in mid-summer. The result? Plants that stay in top flowering condition all season long.
But not all feeds are created equal. If you’re using a slow-release variety, the schedule changes. One application in spring is usually enough. The pellets break down slowly. You avoid the mid-summer rush.
Why does the timing matter? Plants have energy spikes. Early growth needs nitrogen. Late summer needs phosphorus and potassium to keep blooms coming. A quick side-dress hits those spikes. A slow-release feed sets it and forgets it.
Which approach fits your schedule? Side-dressing is hands-on. You see the plant. You feel the soil. It’s real-time gardening. Slow-release is passive. You set it up. You wait.
Don’t overdo the granular. A little goes a long way. Too much can burn roots. Stick to the guidelines. Watch the leaves. If they stay dark green and sturdy, you’re golden. If they yellow, you might need a little more next time.
It’s not rocket science. Just observe. Adjust. Feed. The garden will tell you what it needs.
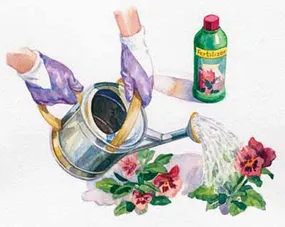
Liquid fertilizer hits fast. It’s immediate. You dilute the concentrate in water, follow the label, and apply. It helps new transplants shake off the shock of being moved. It replaces granular side-dressing if you need a quick boost. But there is one catch. It smells. Fish emulsion is high in nitrogen. It dissolves in water. Plants absorb it right away. It forces growth. Use it on sluggish potted flowers or vegetables. It wakes them up. Just mix it correctly.
“When gardening in containers, you control the environment. You adjust the soil to suit the plant, not the other way around.”
Why Container Soil Needs to Be Different
Ground soil doesn’t work in pots. It compacts. It suffocates roots. You need volume. You need drainage. You need lightness.
The advantage of container gardening is control. In the ground, you fight what the earth gives you. In a pot, you build what the plant needs. This matters for root health. It matters for water retention. It matters for nutrient delivery.
Choosing the Right Base Mix
Skip the dirt from your yard. It’s too heavy. It turns into concrete when dry. It becomes mud when wet. Both kill roots.
Use a potting mix. Not “potting soil.” The word “soil” implies ground dirt. “Potting mix” is a blend. It usually includes:
– Peat moss or coconut coir for moisture retention.
– Perlite or vermiculite for aeration.
– Compost or aged manure for nutrients.
Look for labels that say “lightweight” or “for containers.” Avoid mixes labeled “garden soil” or “topsoil.” They are denser. They lack the necessary air pockets.
Adjusting for Specific Plants
Not all plants like the same ratio. Succulents need grit. They hate wet feet. Add more perlite or coarse sand. Tomatoes need steady moisture and steady food. A standard peat-based mix works well. Herbs often prefer slightly drier conditions. Ensure at least 20-30% of the volume is drainage material.
The Importance of Drainage
Pots must have holes. Multiple holes are better. One hole can clog. Two or three ensure flow. If your pot lacks holes, drill them. Clay pots breathe. Plastic pots do not. Plastic holds water longer. You may need to water less often. But the risk of rot is higher.
Amending Your Mix
Standard mixes are good. They are reliable. They are not perfect. You can tweak them.
Add lime if your plants prefer alkaline soil. Most vegetables don’t care much. Most flowers prefer neutral to slightly acidic. Test your pH if you are serious. It takes ten minutes. It saves you months of guessing.
Add slow-release fertilizer if you won’t be feeding often. Liquid fertilizer is for quick fixes. Slow-release is for background fuel. They work together. Use liquid for the shock of planting. Use granular or coated pellets for the long haul.
Watering and Maintenance
Container plants dry out faster than ground plants. Sun beats down on all sides. Wind hits the exposed surface. You water more often. You check the soil daily. Stick your finger
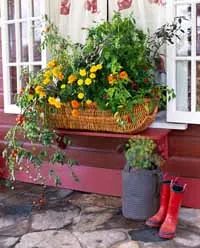
Starting with containers is smart. You control the variables. Light, water, soil type—it’s all yours. But don’t make the mistake of treating potting soil like garden dirt.
Your plants are trapped. They can’t wander off seeking moisture or escaping rot. Everything they eat comes from that single pot. So the mix matters.
Why Standard Garden Soil Fails Here
In the ground, roots have options. In a pot, they don’t. If the soil is too dense, water sits. Roots drown. If it’s too loose, it dries out fast. You need balance.
Texture and fertility are non-negotiable. Plants depend entirely on what’s inside the container. They can’t send roots out farther to find nutrients. They can’t escape soggy conditions.
Choosing Your Base
Most beginners buy bagged soil. It’s safer. It keeps pests and diseases out. You can use your own compost if you trust it completely. But if you’re new, stick to commercial mixes.
Look for a mix labeled for potted plants. These are pre-formulated. They handle drainage and moisture retention better than raw garden soil.
DIY Potting Soil Recipe
Want to mix your own? It’s not hard. Here is a standard ratio:
- One-third loam
- One-third peat moss or compost
- One-third perlite
Add time-release fertilizer beads to this mix. Follow the package directions. This gives plants steady nutrients. They won’t starve mid-season.
Boosting Moisture and Drainage
Consider adding gel granules. They help keep soil moist longer. Useful for hot windowsills or windy balconies.
Some plants hate wet feet. Narcissi, tulips, cyclamen—bulbous roots rot easily. For these, add extra perlite. A lot of it.
Top the pots with tiny pebbles or a quarter-inch layer of perlite. This improves surface drainage. It also looks tidy.
What If It Doesn’t Work Out?
Sometimes the mix is off. That’s okay. Adjust as you go. Watch for wilting. Watch for yellowing leaves. The soil tells you what it needs.
Related Resources
If you’re still learning, dig deeper.
- How to Start a Garden : Get the basics down.
- Garden Soil Tips : Understand your soil type.
- Vegetable Garden Soil : Prepare and test for veggies.
- Container Gardens : Nurture your potted plants.
- Gardening Basics : Master the fundamentals.