Your fridge never sleeps. It buzzes in the corner and spins 24/7 so the milk doesn’t go sour and the steak doesn’t spoil. Given the constant workload, it’s a wonder how rarely they actually quit.
But when they do? That’s a panic moment. You have expensive repair bills, trips to the supermarket for emergency supplies and the possibility of losing half your fridge. Don’t buy new equipment just yet.
The most common problems can be solved without a service ticket. You just need to know what you’re touching. This guide covers the basics of refrigerator repair so you can solve simple problems yourself and know exactly when it’s time to call in a professional.
How a refrigerator really works
Ignore the complexity for now. A refrigerator is basically a device that pushes heat. It uses two main coils and a liquid coolant to transfer heat from the inside to the outside.
Condenser coil is located behind or at the bottom of the unit. It releases heat into the kitchen air. The evaporator coil is located inside the refrigerator or freezer. It absorbs heat from the food.
The compressor pumps liquid refrigerant into these coils. When the liquid hits the evaporator, it evaporates and absorbs heat from the air inside the box. The air is getting colder. simple physics.
Most modern devices are frost-free. Relies on an automatic defrost cycle. The timer activates the heater to melt the accumulated ice. The ice melts first in the coldest areas. When the thermostat detects that the ice is gone, it turns off the heater and restarts the cooling cycle. No need to scrape manually.
This system is powered by a capacitor motor. These components, along with switches, thermostats, heaters and fans, form the backbone of your cooling system. The good news: a DIYer can test and replace many of these components.
安全第一:电击危险
有一条规则是不容谈判的。
拔掉设备插头。
在接触任何一颗螺丝之前,请先拔掉插头。 但这对于旧型号或特定型号来说还不够。
许多压缩机电机都有电容器。 它是一个圆柱形部件,位于电机顶部的外壳中。 电容器储存电力。 即使电源关闭,存储的电荷仍然存在。
如果你碰错了电线,你会受到严重的电击。 在对其进行操作之前,必须将电容器放电。 如何? 您需要一把绝缘螺丝刀来桥接端子,安全地排出残余能量。 如果您不习惯这样做,请停止。 打电话给专业人士。
你能解决什么与不能解决什么
您可以检查门垫圈、更换恒温器和更换除霜计时器。 这些都是可以访问的。 他们磨损了。 它们可以用基本工具替换。
但是冷却系统呢? 那是一个不同的故事。
密封系统含有制冷剂。 它需要专门的仪表、真空泵和许可才能正确处理。 您无法自行修复管道泄漏。 如果压缩机电机内部烧坏,情况也是如此。 这些工作需要专业的服务人员。
尝试自行修复密封系统通常意味着进一步损坏设备。 或者更糟糕的是,让自己接触危险的制冷剂。
知道线路。 如果涉及打开密封电路,请退后一步。 如果只是外部的开关、风扇或线圈,就可以了。
让我们看看您可以实际测试的组件。
Safe discharge of capacitors
Repairs cannot be started safely unless the operating capacitor has been discharged. It works like a battery and stores high-voltage electricity even after a power outage. If you touch the terminals while it’s live, there is a risk of serious electric shock.
First, Unplug the device. Don’t skip this. Gravity or a faulty relay won’t drain the cap due to gravity or relay failure.
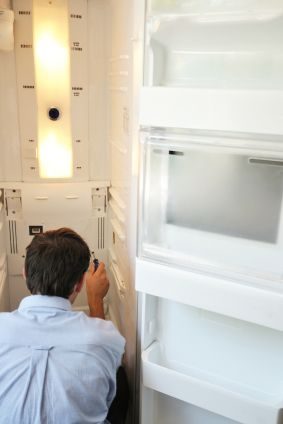
Next, you need to get to it. A capacitor is a cylindrical component that resembles a large dry battery. It is located in a metal or plastic case on top of the compressor motor above the compressor motor. You may need to remove the rear service panel to do this. In some models, the panel is located under the front door. If you are not sure how to remove these panels, please refer to the removal instructions below.
How to safely discharge a capacitor:
Do not use a screwdriver. This can cause arcing or sparks that can damage parts or cause personal injury. Use the appropriate tools: 20,000 ohm, 2 watt resistor. It can be bought at electronics stores and large home centers. It is cheap and saves the trouble of going to the hospital.
- Connect the resistor’s probes to the capacitor terminals.
- If the cap has three terminals (common with dual-run caps), touch one probe to the middle connection (usually labeled C or Common) and the other probe to one of the outer terminals (hermetic or Start). Stay there for a few seconds.
- Move the probe to another external connector (fan or start) and press and hold again.
- Once the capacitor is discharged, it can be safe to handle.
Accessing Internal Components
冰箱维修mostly about access。 制造商将the guts隐藏在面板后面,以使设备看起来更时尚。 你必须挖掘。
上半部分(Controls和制冰机)
顶部和上部内部部分装有恒温器、除霜定时器和制冰机控制装置。 它们通常位于塑料或金属盖后面。
* 寻找螺丝。 它们可能隐藏在橡胶脚、装饰件或冰盒本身下面。
* 如果没有螺丝,请寻找卡扣夹。 使用硬刃油灰刀或塑料trim removal tool。 轻轻撬开。 你不想让塑料破裂。
* 拉出架子通常可以为您提供弹出front panels所需的杠杆作用。
* 一些controls突出并充当固定器。 先把它们Unclip。
Lower Section(压缩机和冷凝器)
The heavy lifting发生在底部。 压缩机、冷凝器盘管和冷凝器风扇位于密封隔间内。
* 后面板: 拧下冰箱底部后部的维修面板。 这是最常见的access point。
* front panels: 某些型号的前面有一个kickplate。 它可能会拧入,或者可能只是向上滑动并从两个侧支架上滑落。
* Bottom Access: 一些较旧的或商业风格的设备可以让您从底部将冰箱tip the fridge back。 警告: 仅当冰箱完全除霜、拔掉插头且空时才执行此操作。 到处都是水和倾斜的压缩机油移位可能会造成永久性损坏。
如果压缩机、冷凝器或蒸发器盘管发生故障,请停止。 这些是sealed systems。 您无法用扳手修复泄漏或电机烧毁。 这是拥有恢复设备的专业人员的工作。
Testing the Power Cord
Before you disassemble the refrigerator, check the obvious things. A faulty power cord is a silent killer of cooling performance.
Look at the cord. Is it worn out? Cracked? Are there burn marks on the plug prongs? Are there black burn marks on the terminal screws inside the terminal block (under the rear panel)? If this happens, the power cord is damaged.
Check for continuity with a volt-ohm-ammeter (VOM) set on the RX1 scale. If the resistance is infinite (open circuit), the internal wiring is open. Replace it. Do not tape.
The Door Connection
这是大多数人忽略的事情:门是一个主要的故障点。
每次打开冰箱时,都会让温暖潮湿的空气进入。如果密封不好,压缩机就会不断运转。 如果门关不紧,蒸发器盘管上就会结霜。 这种霜就像隔热层一样,阻止冷空气接触到你的食物。
温度波动、过度结霜,甚至漏水都可以追溯到门的维护。 用一美元钞票进行简单的间隙检查就可以告诉您垫圈是否密封正确。 如果钞票很容易滑出,则需要清洁或更换垫圈。
诊断症状
冰箱很复杂。 冰箱变热可能是由于冷凝器盘管脏了、启动继电器坏了、阻尼器卡住了或者恒温器故障了。
如果您已经检查了电源、caps, and the door,但设备仍然没有冷却,则需要采取系统的方法。 故障排除图表可帮助您将症状与原因相匹配,这样您就不会更换不需要的部件。
The refrigerator compressor must not run continuously. If this is the case, you will burn electricity and shorten the life of the device. The culprit is often not the engine. It’s a door. The purpose of the seal is to keep cold air in and warm air out. But every time you take a soda, the seal breaks. Here is how to ensure it snaps shut tight every time.
How to test the door seal
The seal is a rubber seal around the door. Over time, it gets hard. It cracks. When this happens, the seal fails. Efficiency decreases. You can test it with something you already have: a dollar bill.
Place the bill between the gasket and the door frame. Close the door. Try to pull it out. If you feel resistance, the seal is holding. If the bill slides out or falls easily, the gasket lets air in. You need to change it.
Don’t test just one point. Check the entire door. However, check the hinges before removing anything. Sometimes the door itself is misaligned, causing a leak that a new seal won’t fix.
Replacing the refrigerator door seal
If the test fails, it’s time for a new seal. Don’t skimp. Buy a gasket made specifically for your refrigerator model. There are generic “fit” seals, but fitting them to a specific door configuration is a nightmare. Not sure about your model number? Cut a small piece of the old gasket and take it to the hardware store. They can match it.
If you have to wait for a part, you can glue the cut part back together with rubber glue. This is a temporary solution. It will remain in place until the new part arrives.
Here you will find step-by-step instructions for replacing the gasket.
1. Prepare a new gasket
The new rubber is stiff. It must be warm. Let the new gasket sit in the room with the refrigerator for about 24 hours. This ensures that the correct temperature and humidity are achieved. Alternatively, you can soak it in warm water to make it pliable. Flexible rubber is easier to install than rigid plastic.
2. Remove the old seal
Seals are fixed with screws, clamps or glue. Some have a support strap to guide you into place. In certain models, the seal is hidden under the edge of the door panel and is held in place by spring steel crimps, bolts or screws.
Identify your type. Remove the fasteners that secure the seal and any mounting strips. Or remove the door panel fasteners if your device is designed for this purpose.
3. Remove the seal
Remove the fasteners from one side of the door at a time. Do not remove the entire door panel at once. Be careful if your gasket has spring clips. They are under tension. If you pray too hard, they may pop out of their mounting holes. If the gasket is stuck, gently pry it off with a putty knife.
4. Clean the assembly area
After the old seal has been removed, the surface should be flawless. Use mild household detergent and water. If there are hardened adhesive residues on the surface, use mineral spirits and fine steel wool. Then rinse with detergent and water. A dirty surface means poor sealing.
5. Install a new gasket
Start at the top of the door. Work your way down the sides. Smooth the gasket into place as you go. Ease it around the corners. If the manufacturer specifies the use of sealing glue, use it now. Make sure the gasket is even. No lumps. No curled edges.
6. Secure and Adjust
Replace the fasteners, mounting strips or plate. Once the gasket is in place, adjust the set screws. Tighten or loosen to make sure the seal sits evenly against the door frame. Once you’ve glued it in place, you’re mostly waiting for it to conform.
Things to note about the freezer door
Test the freezer door seal using the same dollar bill trick. If this fails, you will need a new freezer-specific seal.
Here’s the catch: Don’t remove the freezer door to replace the seal. Freezer doors are often tightened with strong spring devices. This is difficult. Removing the door can cause a headache during assembly. In some models, you may even have to disassemble the wires. Keep the door attached if you can. It saves a lot of trouble.
固定门铰链并对齐
如果您的冰箱门没有密封,请先不要责怪垫圈。 未对准的铰链可能会导致整个门下垂或摇晃。 当这种情况发生时,即使是完美的密封也会失效,因为间隙是结构性的,而不是材料性的。
首先检查水平。 如果门关不紧,请将冰箱稍微向后倾斜。 您可以通过支撑前部或将前调平腿拧松两整圈来完成此操作。 调整直至门自行关闭。 不要过度倾斜设备; 保持其接近水平以避免对压缩机造成压力。
调平通常可以修复轻微的下垂。 如果门仍然漂移打开,请拧紧铰链螺钉。 这可能很棘手。 您可能需要打开冷冻室门才能接触到硬件。 有些型号将这些螺钉隐藏在塑料盖或装饰件下。 用螺丝刀轻轻地将它们撬开。
如果门在拧紧后下垂,请尝试加垫片。 松开铰链螺钉,然后在支架和门之间滑入形状像铰链的纸板垫片。 将其重新拧紧。 如果下垂加剧,则说明垫片位置错误。 将其取下并尝试不同的厚度或位置。 这是一个反复试验的过程,但它确实有效。
变形的门是另一个罪魁祸首。 拧紧将内门壳固定到外壳上的螺钉。 这可以拉直弯曲的门。 之后您可能需要重新调整垫圈以确保正确密封。
不要忘记锁扣。 较新的装置使用磁性闩锁。 如果门没有咔哒一声关上,请从内门壳上取下磁吸板。 用薄纸板稍微垫一下,将其拉近。 您可能需要调整垫圈以匹配新的对齐方式。
Door switch troubleshooting
The light switch is located in the door frame. This is a small button component. Pressing the button while the door is closed cuts off the power from the lamp. If the switch fails, the light stays on. This constant heat raises the internal temperature and forces the compressor to run for longer periods of time.
Check the light bulb first. Is it burnt out? If the light does not come on, replace the bulb. If it’s still on, the switch is the suspect.
Press the button manually. Does the light go out? If not, wipe the switch with a cloth. Dust and dirt can interfere with contact. If cleaning does not correct the problem, it must be replaced.
Remove the switch from the door frame. The screws are often hidden under plastic trim. Remove the trim or unscrew the housing. With the switch exposed, test it with a volt-ohm meter (VOM) set on the RX1 scale.
Clip one probe to each terminal. Press the button. The meter should read zero ohms. If the pointer exceeds zero, the switch is faulty. Replace it with an identical model.
Rewire the new switch the same way you wired the old switch. Snap the trim back on.
Once the door mechanism is finished, the exterior is ready. The next step is to go inside. Let’s take a look at the internal components. From leaks to the ice maker, the true heart of the refrigerator awaits.

When to Call It Quits: Limit switch
Not all refrigerator repairs are part of your workshop’s toolbox. Some components are easily replaceable. The rest is better left to professionals who know which wires to touch and which to leave alone. Take the limit switch. This is a safety device found only on frost-free models, designed to shut off the defrost heater if the temperature gets too high.
If you’re staring at an ice-covered freezer, your first instinct might be to blame the limit switch. It’s a common culprit. But don’t jump straight to a diagnosis. The evaporator fan, the defrost timer, or the heating element itself can fail in the same way. Test these components first. If they all work properly, the limit switch is probably the culprit.
Do not try to fix the problem yourself. Limit switches are often sealed units or require precise calibration. Call a professional to replace it. If you make the wrong move, you can break the compressor or create a fire hazard.
Testing the thermostat control
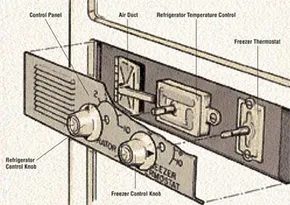
The thermostat control is usually hidden inside the refrigerator. You can interact with it with a visible knob that adjusts the temperature. But how do you know if that button is lying to you? The test depends on the symptom.
Continuous Run Scenario
Is your compressor running all the time? Turn the control knob to the OFF position. If the compressor continues to hum, unplug it. Pull out the control knob and remove the securing screws of the thermostat. Unplug the device and disconnect either the red or blue wire from its terminal. Turn it back on.
If the compressor stops, the thermostat is faulty. Buy a replacement of the same type. If it continues to operate, there is a short circuit in the wires. Stop. Do not fix the problem yourself. Call a professional.
No-cool scenario
The fridge works but the box stays warm? Unplug the device from the mains. Remove the thermostat with a screwdriver. Disconnect both wires. Tape the ends of the wires together with electrical tape to bridge the connection. Plug it in.
If the refrigerator starts to cool immediately, the thermostat blocking the signal. Replace it. Connect the new device exactly the same way the old one was wired.
The Partial Cool Scenario
Freezer is good. Is the fridge warm? Set both dials to the middle range. Remove the knobs – they are usually friction-fit and come right off. Unscrew the housing of the temperature control. Near the dials you can see an air duct.
Swap the knob on the freezer thermostat and turn the control to the OFF position. Open the fridge door. Observe the air duct. If it does not widen within ten minutes, the control mechanism is stuck. Replace the control. Connect the new one the same way the old one sat.
The Evaporator Fan: Airflow Matters
Sometimes the thermostat is innocent. A refrigerator that is warm can also be caused by a broken fan. Check for blockages. Look for broken or bent blades. If the blades are jammed, try to free them. If they are bent, straighten them with pliers.
Does that solve the problem? If yes, you are good. If not, call a professional.
In some models, the door switch dials the evaporator fan. If the fan acts up when you open the door, the problem may be with the switch. Test the switch. Replace it if necessary.
Defrost timer testing and replacement
If the compressor remains silent, the defrost timer is usually to blame. This little mechanical brain is located near the compressor and controls when the device melts the ice. If it gets blocked, frost will build up in the freezer, and the fridge warms up.
Start by unplugging the refrigerator. Safety first. You are working with live electrical components, even if you are just inspecting them.
Remove the timer from the holder. Remove the two fixing screws. Disconnect the wires from the timer and the timer motor itself.
Grab your Volt-Ohm Meter (VOM). Set the RX1 scale. Clip the probes to the defrost timer wires, not the motor wire. Turn the timer adjustment screw by hand until you hear a click. The operating timer shows zero resistance.
If the needle jumps or stays in a high position, the timer is dead. Replace it with an identical model. Rewire the new unit exactly as the old unit.
Still need to check the motor? Clip the probes to the motor wires. Switch your VOM to RX100. A healthy motor reads of 500 to 3000 ohms. More than 3000 ohms means the motor is burnt out. Change it.
Check the defrost heater
The defrost heater is a heating element that is wrapped around the evaporator coil. When the cycle is started, the element turns on to melt the accumulated ice. If it fails, the ice will remain in place and block airflow.
To access this element, the compartment wall panel must be removed. Once exposed, use your VOM on the RX1 scale. Clip the probes to the terminals of the component.
Expect the reading to be 5-20 ohms. If the numbers differ significantly, the element is broken. Install a new heater with the same electrical rating. Reconnect the wires.
Condenser fan cleaning and testing
The condenser fan is located at the bottom of the unit. It pulls air over the coils to dissipate the heat. If this fan stops, the refrigerator will no longer cool efficiently. Sometimes it works all the time, sometimes it never does.
Disconnect the fan motor wires. Set the VOM to RX1. Touch the probes to the fan motor terminals. A good motor reads 50-200 ohms. A high reading indicates that the motor is faulty and needs to be replaced.
While you’re there, look at the blade. Clean off any dust bunnies or debris. If the blade is bent, gently straighten it with pliers. Obstruction causes noise and wear.
Clearing Clogged Drain Ports
氷やゴミは排水管を詰まらせやすいものです。 これらの穴は冷凍庫と冷蔵庫のセクションの底にあります。詰まりが発生すると、霜取りサイクル中に水が行き場を失います。
短い硬いワイヤーを使用して穴に通します。つまようじは使用しないでください。 排水ライン内で木材が砕け、取り除くのがほぼ不可能なさらにひどい詰まりが発生します。
一部のモデルは、蒸発器コイルの近くにドレンポートを配置します。洗浄には大規模な分解が必要です。 冷凍庫の分解に不安がある場合は、専門家に依頼してください。
コンパートメントの下に「靴べら」型の排水口がある冷凍庫には、取り外し可能なキャップが付いている場合があります。ネジを緩めてそのエリアを直接掃除します。
Inspecting the Drain Hose and Pan
霜取りサイクルからの水はホースを通って冷蔵庫の下のパンに流れ込みます。パンはコンプレッサーの近くにあり、熱で水分が蒸発します。
ホースを確認してください。ゴム製のものもあります。時間が経つとゴムにひび割れが発生します。亀裂が見られる場合は、同じ種類のホースと交換してください。
床を見てください。水が見える場合は、鍋がブラケットから傾いている可能性があります。または、鍋自体に亀裂が入ったり、錆びたりする可能性があります。漏れを止めるには、受け皿の位置を再調整するか、受け皿を完全に交換してください。
修复堵塞的制冰机
自动制冰机有时会因进水阀过滤器堵塞而发生故障。 沉积物随着时间的推移而积累。
拔掉冰箱插头并关闭供水。 断开阀门处的水管,通常位于设备底部。
找到阀门内的钢丝过滤器。 把它拉出来。 用硬刷和温和的家用清洁剂清洁它。 冲洗它。 将其放回原位。重新连接线路。 按照相反的步骤重新组装。
处理制冷剂泄漏
制冷剂泄漏有明显的刺鼻气味。 您可能会在压缩机区域附近注意到它。
您无法自行修复制冷剂泄漏。 该系统在压力下是密封的。 尝试修复它需要专门的设备和认证。 立即致电专业维修技术人员。
When to call a professional: Compressor and engine problems
Compressor and motor are closed units. They are the heart of the refrigerator. If your cooling problems are caused by these components, stop.
Do not open or repair. Requires welding, vacuum pumping and accurate refrigerant filling. Leave it to the experts.
Now you know how to handle the little things. Washing machines, timers, heaters and fans are all within reach of DIY enthusiasts. There are no compressor or refrigerant leaks. Understanding the differences can save you money and prevent injuries.
The next time your fridge breaks, you’ll know whether to grab the screwdriver or the phone.
Frequently Asked Questions
How do I know if my refrigerator has a problem with the compressor?
Signs include the refrigerator not cooling down, strange noises or the compressor getting too hot to touch. It may also stop working altogether.
What is the best way to clean refrigerator radiators?
Remove the refrigerator. Locate the coil (behind or below). Carefully remove the dust with a reel brush or a vacuum cleaner attachment. Wipe away any remaining debris.
Where to search next
If you’ve worked in the kitchen and it’s not just the plumbing that’s causing you problems, chances are the rest of the house has similar problems. By repairing one device, you often learn the logic of repairing another device. Once you’ve mastered the basics of gutters or drywall, you may want to tackle the heavy hitters.
A broken dishwasher can ruin your dinner plans, but it can usually be fixed with a simple fix to filters, spray arms or door latches. An oven that doesn’t heat properly may just need a new igniter or a recalibrated thermostat. These are large devices, and although they look intimidating, the internal components follow standard electrical and mechanical rules.
Don’t stop at the kitchen. The laundry room has its own secrets. A non-spin washing machine may have a stuck lid switch or a worn belt. A tumble dryer that does not heat may be suffering from a blocked vent or faulty thermal fuse. Cleaning these vents is a fire safety step that most people overlook until it’s too late.
The goal is not just to fix leaks. It’s about understanding how systems work. When you know why a part failed, you no longer fear failure. You begin to see the problem as a puzzle with a solution.
There’s a whole world of repair guides out there. They break down the exact steps of each machine. You don’t have to guess. You need to look. Find the model number. Check the schematic. Order a part. Do the work.
It saves money. It saves time. And you don’t have to worry about the lights flicker anymore.