


There are many different types and styles of unfinished furniture available, but how do you know which one to buy? When you find a good unfinished piece of furniture, how do you give it an antique feel?
These questions are answered on the following pages. start at square one, we will tell you what you should pay attention to when choosing unfinished furniture.
Assessing Unfinished Furniture
Unfortunately, price is the first indicator. You really get what you pay for with this furniture. Before you buy an unfinished piece, do some comparisons and see what’s available. Most unfinished furniture is made of pine, but some is made of other wood. Regardless of the type of wood used, the quality of the wood and the craftsmanship of the piece vary greatly.
Once you’ve found your favorite piece of furniture, take a closer look. Is the wood clear, knotty, smooth or rough? Cheaper furniture often has knots and sap lines. More expensive pieces are made from high-quality wood. What state is the wood in? Cheaper furniture is unfinished and may have rough edges or deep saw marks. Good quality unfinished furniture usually comes already sanded and ready for finishing.
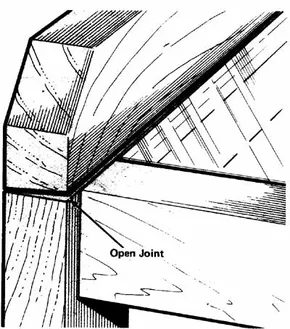
Another important aspect is the manufacturing quality of the furniture. Most unfinished furniture is assembled with staples driven by a power staple gun. If you are not careful when stapling, the joints may not be secure. How sturdy is the piece? Does it have wobbly legs or parts not firmly attached? Loose joints can be repaired, but piece that’s badly matched or are completely broken are difficult to repair.
Are the doors and drawers aligned correctly and do they operate smoothly? If not, are the openings the wrong size, or are the hardware or drawer guides loose or improperly attached? Mechanical problems can be fixed, but parts that are too large or too small cannot be adjusted. Check all moving parts to make sure they are cut, joined, and assembled correctly. You can do a lot in finishing, but you can’t redo a bad job.
The style of the furniture is also important. Look at the style. Do you like the lines of this work? Is it doing the job you want it to do? Don’t settle for the wrong size or style of furniture. You shouldn’t settle for something you don’t really want. On the other hand, piece of furniture that’s basically right can be given the personality you want with different hardware, moldings, accents or special finishes.
Before you make a final decision, estimate the work that needs to be done to finish the piece, such as cleaning out knot holes and sap pockets, regluing legs, renailing drawers, repairing cracks, smoothing splintered edges, and replacing hardware. How much time and effort does it take? How much hardware and trim will you have to add? Is it the right size and style? Do you like the wood? How much money can you save by buying an unfinished piece? It all comes down to one basic question: “Is it worth it?” If you choose carefully, it is.
Assessing Surface Damage
No matter how carefully you shop, unfinished furniture can have problems. The joints may be loose; moving parts may stick. There are a lot of knots in the wood, these will bleed through the finish if it is not sealed. In most cases there are rough edges or saw marks. Take the time to address these issues before you distress the wood Your results justify your efforts.
Loose joints and poor assembly: The first step in handling unfinished furniture is to make sure it is sturdy. Check the joints to identify weak points. drawers are especially likely may need to be reinstalled. If the staples or other fasteners are solid, you probably won’t need to reattach them, but if they’re off-center or don’t look strong enough, reinforce them with a finishing nail next to them. Drill pilot holes for the nails to prevent the wood from splitting. If the staples come loose, pull them out with pliers and renail the joint. Fill the staple holes with wood filler.
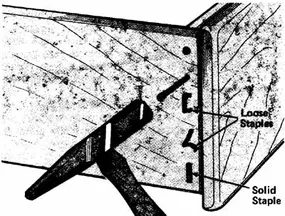

Stable structure
Loose legs, rungs, arms and spindles are the first problems to be addressed. This step cannot be skipped. If the joint is loose, fasten it again. Test every part of the part to make sure it is secure. Tighten anything that feels loose. No compromises are made when it comes to structural integrity.
Fix the Drawers
The drawers should slide out. If it sticks or vibrates, check the guides. Look inside the frame. Check the runners at the bottom. Must be square. It must be firmly attached. Nail heads must not protrude. These get stuck and ruin the finish.
If necessary, reinstall the rails or slide rails. Use the nail set to countersink the ends of the protruding nails. This keeps the surface flat. Prevents it from sticking to clothes or fabrics. This is a small detail. This is important.
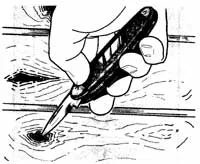

Even before you pick up the sanding piece, pay attention to knots and sap pockets.
Let’s take a closer look. Those looking for resin beads and flow lines.
Scrape off the hard part. Must be clean.
Use a soft cloth moistened with turpentine. Wipe away the knots.
If the big knot is loose, don’t try to fix it. Pull it out.
Apply carpenter’s glue around the hole.
Push the knot back into place. Make sure it is flush with the surface.
Sealing the Bleeders
Small knots are different.
Pin knots should be removed entirely.
Fill these small holes with wood putty or water-based putty.
Next comes the sealant.
Use a 1-pound-cut of white shellac.
This is non-negotiable for knots.
If the wood drinks it all up immediately, add more coats.
Continue to apply until the knot is completely sealed.
One layer is not enough for porous wood.
Smooth rough edges
Surface roughness can be corrected quickly.
Sand the edges.
Make it smooth.
Low spots? Are there any holes in the wood?
Fill them up.
Use wood filler or water-based putty.
Grind until the filler disappears into the grain.
This is an important detail.
The edges of the square should be slightly rounded.
Not much. Just a little hint.
Use fine sandpaper on the blocks.
Do not plane the edges.
There is a risk that the wood will splintering the wood.
You want a smooth surface, not a jagged, messy surface.
Repair saw damage
Dull blades can leave scars.
Notches. Splinters.
Find out where the wood is cut or joined.
Shallow notches can be polished.
You can sand them out.
Most situations require more effort.
Fill them with wood plastic.
Sand the plastic smooth.
Matches the grain of the surrounding wood.
This prepares the surface for the next step.
Next steps
The restoration work has been completed.
The surface is dense and smooth.
Now you can start the distressing process.
This is where character comes in.
More information on this will be released soon.


