


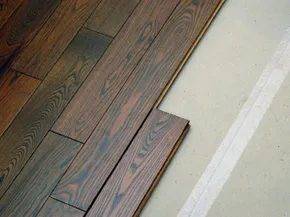
Trees probably didn’t cheer when Pergo invented laminate. But homeowners did. It looks like wood, costs less, and skips the sanding, staining, and finishing headaches. It resists scratches, dents, and fading. Thirty years in, it’s everywhere. You can lay it right over old floors. That makes it a favorite for quick upgrades.
There’s still wood in there. Mostly. A plank has four layers bonded with heat and pressure. The top is a clear aluminum oxide sheet. It fights stains and protects what’s underneath. Below that sits a decorative layer of melamine resin and aluminum oxide. This mimics wood grain or ceramic tile. The core is high-density fiberboard (HDF) soaked in resin to fight moisture. The bottom is a stabilizing backing, also resin-saturated.
Because it’s made from cellulose fibers, laminate moves. It expands and contracts with humidity. That’s why it floats. The planks interlock via tongue-and-groove. They don’t nail to the subfloor. They sit on top. This lets the floor breathe. Which means bathrooms, saunas, and laundry rooms are off-limits. Too much humidity ruins the deal.
What You Need to Install Laminate Flooring
The tool list gets long. It depends on your subfloor and the scope. But you can’t skip the basics.
Materials
– Flooring planks
– Underlayment (unless attached to the plank)
– Barrier sheeting
– Laminate glue or adhesive (for specific joints or transitions)
– Polyethylene tape
– Quarter-round molding or baseboard
– End molding, thresholds, transitions
– Stair nose pieces
– Plastic sheeting for furniture protection
Tools
– Tapping block
– Pull bar
– Spacers
– Safety goggles and gloves
– Utility knife
– Hammer
– Pencil and tape measure
– Carpenter’s square
– Router
– Drill
– Saws (table, miter, circular, hand, jigsaw)
– Dividers
– Chalk line
– Pocket plane
– Cleaner and white vinegar
You can buy an installation kit for about $20. It usually includes the tapping block, pull bar, and spacers. Saves a trip to the hardware store.
Prepping the Subfloor for Laminate Installation
Bad prep leads to bad floors. Your subfloor needs to be flat. If it’s concrete, grind down high spots. Fill low spots with leveling compound. Remove all carpet and padding unless the carpet is quarter-inch (6 mm) or thinner. Scrape off old adhesive. You want a clean, flat surface.
Trim work comes next. Remove baseboards if you can. It’s optional, but it helps. You’ll need new quarter-round molding later to cover the expansion gap. If drywall doesn’t meet the floor, nail a 2- to 3-inch-wide strip of quarter-inch plywood to the studs. It creates a solid edge.
The underlayment matters. It cushions the hard surface and deadens noise. Some planks come with it attached. Check your product.
Measure the room. Add 10 percent for waste. Don’t guess. Measure the distance between start and end walls. Divide by board width. If the last strip would be too narrow, adjust the starting plank. Add the remainder to the plank width and divide by two. This balances the room.
Humidity control is key. Keep the room between 45 and 65 percent relative humidity. Leave a quarter- to half-inch (6 to 13 mm) gap around the perimeter. Around pipes, cabinets, and stairs too. This is the expansion zone.
Undercut door jambs and trims. Let the floor slide underneath. Check door clearances. You might need to trim the bottom of doors if the new floor is taller.
Some planks need acclimation. Let them sit in the room for a few days. Keep the temperature at least 65 degrees Fahrenheit (18 degrees Celsius). Do this before, during, and for two days after install.
Safety First: Handling Wood Dust
Power tools make a mess. Wood dust isn’t just annoying. The International Agency for Research on Cancer classifies it as a nasal carcinogen. Use a dust collector if you have one. Wear a NIOSH-approved dust mask. Cut outside if you can. It keeps the job site cleaner and your lungs safer.
You’re prepped. The canvas is ready. Now comes the install.
Why laminate flooring looks less like plastic today
Laminate isn’t just wood anymore. It mimics ceramic tile, brick, even slate. The trick is the decorative layer, often called the pattern layer. Think of it as a photograph. High-resolution printing tech has improved drastically over the last decade. That’s why modern laminate looks real. Ten years ago, it looked like… well, laminate. Now, the resolution is sharp enough to fool the eye.
How to install laminate flooring planks correctly
Your specific installation might vary. These steps focus on the most common type: board-style planks with tongue-and-groove locking mechanisms.
Start on the left. Work right. Place spacers against every wall. This creates the expansion zone. Lay the first plank. Slide a second piece to its right. Align the short ends. Lock them.
Hit the end of the row? Measure the gap between the last full piece and the wall. Subtract a quarter-inch (6 mm). Cut that off. When you saw it, keep the decorative side facing up. Use a handsaw or a power tool with a carbon-tipped blade. Face-up cutting minimizes chipping on the visible surface. Use a pull bar to jam that last piece into place. Make sure the joints are tight. Did you remember the spacer between the wall and the board? Good.
Start the next row with that leftover piece from the previous one. Only if it’s long enough. Less than 8 inches (20 cm)? Toss it. Stagger the end joints by at least 8 inches (20 cm). It looks better. It’s stronger. Angle the new boards. Lock the short ends first. Then the long side. Once the row is connected, angle the whole length. Push it forward into the groove of the first row. Walk on it. Press it down. Keep going.
The last row usually needs lengthwise cuts. Lay the loose planks on top of the installed row. Use a spacer and a scrap plank to trace the wall’s contour onto the board. Trace the bumps. Cut along the line.
Which direction should laminate flooring run?
Experts usually say parallel to the longest wall. But light matters. If your room has big windows, run the boards perpendicular to them. The seams catch the light differently. It looks cleaner. You can also install on an angle. It’s attractive. It’s a pain. You’ll cut more pieces. It requires better skill. Do it if you have the time.
Finishing the laminate flooring installation
The end is tricky. Lots of small cuts. Take your time. Don’t rush. You didn’t work this hard to botch the last step.
Did you put down underlayment that goes up the walls? Cut it flush with the top of the floor. Now. Remove all the spacers. Install the baseboard or quarter-round molding. This hides that quarter-inch (.6 cm) expansion gap. Crucial rule: attach the trim to the wall or subfloor. Never to the laminate. The floor needs to move. Humidity changes. If you nail it down, the floor will buckle.
Install the trim track on the subfloor where needed. Glue or nail it. It holds the transition pieces. Use T-molding where two floors meet in a doorway. Manufacturers sell specific pieces for transitioning to tile or carpet. End molding works for sliding doors or open edges.
Clean up. Vacuum. Damp mop. If you used glue or tape, buff the surface with a dry towel. Remove any sticky film.
You’re done.
Laminate flooring dimensions and options
Quick-Step offers five product lines. Planks range from 23 to 54 inches (58 to 137 cm) in length. Widths go from 4 to over 7 inches (10 to 18 cm). Thickness is usually 5/16 or 6/16 of an inch (.8 to .9 cm). Some have beveled edges. Others look like two or three boards joined together. The country collection has surface texture. It replicates hand-scraped wood. Some lines work with underfloor heating. Check the specs.
How to Install Laminate Flooring Without Ruining Your Day
You’ve got the planks. You’ve got the room prepped. Now comes the part where most people panic. Don’t. Laminate installation is basically giant, forgiving puzzle pieces. It’s not carpentry in the traditional sense. It’s geometry with glue-free rewards. But you have to respect the expansion gap. Seriously. If you ignore it, your floor will buckle. It’s physics, not magic.
The subfloor matters more than you think
Check your subfloor. Is it flat? If not, fix it. Uneven subfloors mean clicking sounds underfoot and broken locking mechanisms. Use a level or a straight edge. Any dip deeper than 3mm over 3 meters needs filling. Concrete gets a moisture barrier. Wood needs to be dry. Pergo and Quick-Step both emphasize this. Why? Because laminate is engineered wood fiber. It swells. It hates water. It hates uneven surfaces.
Roll out your underlayment. This isn’t just cushioning. It’s noise reduction and moisture protection. Tape the seams. Don’t overlap it too much, or you’ll create bumps. Some laminate comes with attached underlayment. If yours does, skip this step. Read the box. Always read the box.
Which Way Do The Planks Go?
Lay them perpendicular to the joists if you’re on wood subfloors. It adds strength. On concrete, go with the light source. Parallel to the main window usually looks best. It makes the room feel longer. Wider planks? Lay them parallel to the longest wall. It’s a visual trick. One that actually works.
Start in the corner. Not the center. The center is for vanity projects. Start in the top left or right corner. Leave that 10mm expansion gap. Use spacers. Cheap plastic things that save your sanity. Without spacers, you’re guessing. Guessing leads to crooked walls.
The first row is critical. It has to be straight. Measure twice. Cut once. Use a jigsaw for curves or an oscillating multi-tool for tight cuts. A circular saw with a guide is faster for straight cuts. Wear ear protection. The noise is loud. Dust is everywhere. Wear a mask.
Click-Lock Systems: The Secret Sauce
Modern laminate uses click-lock systems. Pergo has Unilin click. Quick-Step has Uniclic. They’re similar but not identical. Don’t mix brands unless you’re feeling lucky. The angles matter.
Lay the first plank with the tongue side facing the wall. Insert the second plank at a slight angle. Usually 20-30 degrees. Hook the tongue into the groove. Then lower it down. You’ll hear a click. Good. That’s the sound of success. If it doesn’t click, lift it up. Try again. Forcing it breaks the lock.
For the end joints, stagger them. Randomize the lengths. Don’t create a ladder pattern. It looks cheap. Keep the end joints at least 12 inches apart from the previous row. This distributes stress. It hides imperfections. It looks professional.
Cutting the last plank in a row? Measure the space. Add the expansion gap. Mark the plank. Cut it. Flip it upside down for the next row’s starter


