You don’t need a degree in art to transform a boring room into something with serious presence. A strong supergraphic or a full-wall mural can completely change the vibe of a space. And no, you don’t need to be a pro to pull it off. The secret isn’t freehand skill; it’s a simple grid system.
It’s basically engineering for your walls. You translate a small drawing into a large reality without losing your mind over proportions. Here is how you do it.
The Gear and Stuff You Need
Before you start taping, get your inventory together. You aren’t buying expensive equipment. This is a low-barrier project.
Tools:
* Pencil (standard HB is fine)
* Measuring rule or tape measure
* Bucket and sponge
* Straightedge
* Paintbrushes (various sizes depending on your design)
Materials:
* Graph paper (four squares per inch is the sweet spot)
* Household detergent
* String (strong enough to hold weight but flexible)
* Metal washers or small weights
* Masking tape
* Latex enamel paints
Time:
Plan for one to two days of work plus drying time. Don’t rush the prep.
Designing the Mural
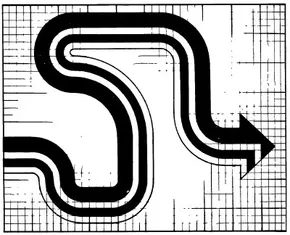
Pick a design. Arrows. Arches. A rainbow. Animals. Trees. It doesn’t matter what it is, as long as you like it.
Draw that design accurately on a sheet of graph paper. Four squares per inch is easiest for enlargement. If you already have a print or picture you love, you can draw a grid directly onto it. Four squares per inch again.
Now comes the math. You have to gauge the grid based on the final size on the wall.
Let’s say your graph-paper design is 4 inches wide and 3 inches high. You want it to be 8 feet wide on the wall. That means it will also be 6 feet high.
Here is the breakdown:
* The 4×3 inch pattern has 16 horizontal squares and 12 vertical squares.
* For 8 linear feet to contain 16 horizontal squares, each foot holds two squares.
* Each square must be 6 inches on a side.
Do the same math for the vertical measurement. The size of each square is strictly determined by your graph-paper drawing and the physical dimensions of the wall. Get this wrong, and your mural will look stretched. Get it right, and it just looks like art.
Preparing the Wall
Don’t skip this. If you paint over dirt, grease, or dust, the paint will peel. It will also look bad.
Wash the wall thoroughly. Use household detergent. Scrub it. Let it dry completely. This takes time. If the wall is damp, your grid lines and paint will behave unpredictably.
Transferring the Design
Decide exactly where on the wall the mural goes. Be precise.
Start at the upper left-hand corner. You need guidelines for the horizontal squares.
- Tape one end of a string at the upper left-hand corner. Let it hang.
- Tie a metal washer or other weight to the bottom.
- Wait for the line to hang plumb (perfectly vertical).
- Tape the bottom end of the string to the wall.
Measure 6 inches to the right of the string. At the top and bottom, tape a second vertical string the same way. Repeat this process until you have placed 17 strings. These form 16 vertical divisions.
Next, you need the horizontal lines.
Measure an even distance down from the ceiling to the upper left and upper right vertical lines of the grid. This determines the top of your mural. Stretch a horizontal string between these two points. Tape it at several points to keep it from sagging. A sagging string means a crooked line.
Once the top horizontal string is accurate, measure down 6 inches on both ends. Position the next line. Repeat until you have placed 13 horizontal strings. This forms 12 rows of squares.
You now have a grid on your wall. It matches your graph paper. You can start painting.
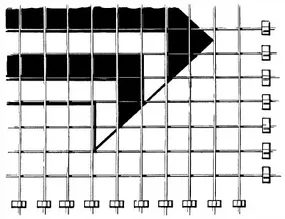
Transferring the Design
Take that grid off the wall. It’s time to move the pattern from paper to plaster. Grab a pencil. Lightly copy the design. Do it square by square. Don’t press hard. You’re marking, not carving. Once the whole layout is on the wall, peel the tape. Pull the strings. Be gentle. You don’t want to rip the drywall or leave sticky residue. Then, go back in with the pencil. Finalize the lines. Round out those curves so they don’t look jagged. Add any parts you missed in the rush.
Painting the Mural
Now comes the color. Use latex enamel. It’s durable. It’s practical. Work one color at a time. If there’s a background hue, start there. Let it dry. Twenty-four hours. Don’t rush this. Wet paint over dry paint just makes mud.
Wash your brushes between colors. Scour them. Get the bristles clean. It saves you from muddy edges later. Paint the solid areas first. Fill in the big blocks. Then mix tones for shading. For highlighting, blend light and dark.
When the graphic is done, let it cure. Another 24 hours minimum. If you want definition, outline key areas. Use black. Use a very fine brush. Hairline outlines. Be careful. Too much outlining looks busy. It clutters the design. Less is more here.
Finishing Touches
Wait. Let the mural dry completely. Before you push furniture back against it. Before you hang those heavy drapes that might brush the wall. Patience pays off here. If the surface gets dirty, clean it carefully. Soft cloth. Mild soap. No scrubbing.
Once it’s dry and safe, think about the rest of the room. A mural is bold. It needs softness to balance it. Make your space cozy. Learn how to make decorator pillows. Add texture. Add plush. It grounds the artwork.