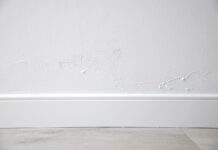
Water is the enemy of brick. Once mortar crumbles, it stops doing its job. It lets rain and humidity seep into your home. The result? Damaged interior drywall and faster decay of the good mortar nearby. You need to act fast.
Tuckpointing sounds fancy. It is just repointing. You don’t need a pro. You need a strong arm and some patience. It costs less than hiring someone. And you can start today.
Gather Your Gear
You don’t need fancy equipment. Just the basics. Make sure you have these tools ready before you start.
- Cold chisel: This is your main tool. It cuts through old cement.
- Heavy hammer: You need weight behind every strike.
- Safety goggles: Dust and shards fly. Protect your eyes.
- Garden hose: You need pressure to flush the joints.
- Small, sharp trowel: For mixing and applying new mortar.
- Jointer or metal pipe: To shape the new joint.
- Stiff brush: Scrubbing out the dust.
You also need materials. Buy mortar mix at any hardware store. It comes in sacks. Add water. Simple. Get mortar coloring too. It helps match the existing brick. Use corrugated cardboard as a color guide. Hold it up against the wall to check the tone.
Time Commitment
Expect to spend half a day on a small patch. Serious damage takes longer. Plan accordingly.
Step 1: Remove the Bad Mortar
Put on your safety goggles. Always.
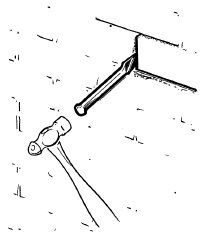
Grab the cold chisel and heavy hammer. Start cutting into the crumbling joint. You must go deep. Cut at least 1/2 inch down. Do not skim the surface. You need a sound base for the new stuff.
Remove all loose mortar. If it is wobbly, it goes.
Work in a specific order. Clean the vertical joints first. Then move to the horizontal ones. This prevents the wall from weakening in one direction while you work on another.
Step 2: Flush the Joints
Still wearing safety goggles, get the garden hose.
Turn up the pressure. Flush the newly cut joints. You are looking for loose dust and tiny fragments of old cement. If you leave dust behind, the new mortar won’t stick. It will crack off in a year.
Make sure every crevice is clean. The hose should spray hard enough to knock loose anything that isn’t solid brick.
This is the foundation of a good repair. Rush this step and the whole job fails.
Matching the Color
You can’t just slap fresh mortar into an existing wall and hope for the best. The color difference will scream for attention. Start by mixing a small batch according to the manufacturer’s instructions. Smear it on a piece of cardboard. Mortar dries fast there, giving you a real-time preview of the final hue.
If the new mix looks too bright or wrong, add mortar coloring. Test again. Repeat until the dried patch on the cardboard blends with the surrounding brick. Only then do you mix the full amount you’ll need.
Wetting the Joints
Dry brick sucks moisture out of fresh mortar. That weakens the bond. Wet the cleaned joints before you start. Use a heavy mist. You want the brick damp to the touch, not dripping. Streaming water delays setting and ruins the finish.
Packing the Mortar
Grab a small, sharp trowel. Fill the joints. Start with the verticals, then move to the horizontals. Pack it tight. Any gaps or air holes mean water infiltration later. And eventually, failure.
Don’t fill everything at once and then go back to smooth it. Finish each joint as you fill it. The mortar stiffens quickly. You’ll lose the window for a clean finish if you wait.
Shaping the Joint
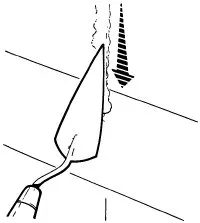
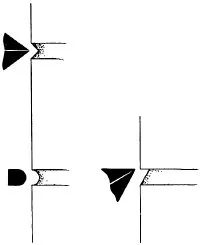
The shape of your new mortar must match the old. If the existing joints are V-shaped, use the corner of your trowel. Hold it at a steady 45-degree angle. Draw the trowel firmly along the filled joint. Shake off excess mortar before you move to the next one.
For U-shaped joints, a mortar jointer is the tool. A piece of small-diameter metal pipe bent into a handle works too. Grip it firmly. Draw it along the joint to create that smooth, concave surface. Match the profile. Blend the repair.
Keep that fresh mortar from hardening too fast. Wet the new joints a few times a day for two or three days. Use the fine spray setting on your garden hose. Don’t blast it. Just mist it.
Once the wall is completely dry, go back over the bricks. Use a dry, stiff brush. Scrub away any excess mortar that smudged onto the surface.
When Bricks Themselves Come Loose
Sometimes the mortar isn’t the only problem. You might find whole bricks that are loose. This means you need more than just repointing.
Doing the job yourself doesn’t save you money if you end up in the emergency room.
Before you touch that loose brick, check your safety. Home-repair safety tips matter. Work smart.
Tool Basics
Does your toolbox have what it takes?
You need the right tools for loose brick repair. A basic toolkit helps. But you need specific items for this job. Check what you are likely looking for before you start.
Repairing a chimney or exterior wall requires precision. If the brick is loose, mortar alone won’t hold it. You need to remove the old brick. Then set a new one.
Start by chiseling out the old mortar. Be careful with the surrounding bricks. You don’t want to damage good masonry while fixing the bad spot.
Insert the new brick. Apply fresh mortar. Press it firmly into place.
Fill the gaps around it. Smooth it out.
Then comes the curing process again. Wet the area. Do it for two or three days. This prevents cracks.
Clean up the residue. Use that stiff brush. Dry it off.
The wall should look solid. Tight.
But check the stability first. Give it a light tap. Listen for a hollow sound. That means it’s not set right.
If it sounds solid, you’re good.
Wait until the next rainstorm to see how it holds. Water reveals cracks. It reveals weak spots.
Watch it for a week.
If it stays put, the repair worked.
If not, you might need more mortar. Or a new brick.
It’s tedious work. But it keeps water out. And water destroys walls faster than time.
Keep your tools dry. Keep your safety gear on.
The wall stands because you made it stand.